Chains of Steel: A User Experience Approach to Blockchain
Class
Human-computer interaction
Timeline
Summer semester 2020, 8 weeks
Tools
Balsamiq, Sketch
Overview
My bachelor's thesis was in collaboration with S1Seven | Metal Identity who aims to
eliminate the physical
paper trail in the steel industry. Today, steel is a global and very fragmented industry
that lacks
data processing standards which not only results in higher costs of doing business but also
increases
opportunities for a number of threats like fraud and negligence. The project expects that by
combining the
blockchain with machine identity and physical tags every steel product can be traced from
the raw steel
in the steel mill to its final application.
My contribution was the creation of a prototype for the user interface design,
which corresponds with the usability principles and simultaneously is aesthetically pleasing.
These are essential criteria to increase the acceptance of the final product by the users.
Considerable research was conducted in order to arrive at the most suitable software solution
and
to establish a secure and easy handling of staff authorizations.
Interviews
Due to the pandemic, I was able to conduct only two semi-structured interviews
with employees of steel companies.
I gathered information on the procedures of purchasing, storing and selling etc. of steel
products.
Most of the time, each steel product is tagged with a shipping label that contains a QR code
which is scanned with a handheld device when the goods are unloaded at the warehouse. The data
are fed directly from the scanner into the ERP system, while the accompanying paper documents
are usually stamped, signed and processed accordingly in the office.
While some steel traders have similar work processes, there are differences regarding the
organizational setup.
Competitive Analysis
I conducted a competitive analysis in order to highlight the strengths and weaknesses of
the
competition.
The competitive analysis examined projects in the same industry as well as comparable
technologies for blockchain wallets.
Personas
The key findings from the interviews and online research were incorporated into the creation of
the user
personas.
The short narratives depict personas who utilize the product in real-life settings.
They concentrated on the behavior of the personas, not only the technology being used by them.
The scenarios also specifically included the timing of user interactions.
Requirements
The requirements for the prototypes were determined through the conducted interviews and
the competitive analyses. As the project asked for a user-friendly prototype for
recording material data at each step of the steel supply chain, special consideration was placed
on the following criteria.
Onboarding Process
The user’s first encounter with
the wallet application will be an onboarding process which sets up the authentication method.
For security reasons, it is mandatory for the user to change the passcode to prevent
unauthorized access to the application. Additionally, the user is offered to add a biometric
identification such as the iOS Face ID to simplify the login.
To complete the onboarding process, the user is led through a few screens introducing the wallet
application.
Security
Within the app, the user is able to update
the authentication method by changing the passcode or by enabling or disabling the biometric
identification. In case that the user cannot access the wallet application anymore (i.e. lost
or damaged smartphone, forgotten passcode etc.) the system administrator can execute the key
recovery. Additionally, the user can (in time, of course) nominate one or several trusted people
as guardians who are then able to restore the access to the app with their own wallets.
Transactions
As the application is a wallet, its
main functionality is the administration of the user’s digital identity and the creation of
digital signatures. When the user scans an item this action does not send data to a
specific recipient, therefore no public address has to be entered. However, this action
constitutes
the user’s confirmation (i.e. the user’s digital signature) that the item has been processed in
a certain context.
Most importantly, all processes have to be fast paced, for this reason, the wallet
application must
provide the user with an easily accessible QR code scanner. Data and information on the current
day’s
pending and completed transactions must be retrievable with a minimum of interactions.
Paper Prototype
The first iteration of prototyping was concluded after a test group consisting of three
evaluators examined the paper prototype.
The tasks chosen to be evaluated focused on two categories, administrative and productive.
Administrative tasks in the framework of the blockchain have a great potential for complication,
therefore it is imperative to simplify such processes and to test for improvements. Productive
tasks were selected for testing because they are after all the core functions of the app.
Paper prototype of the employee scanning a delivery
Wireframes
Based on the usability evaluation and the test users’ suggestions for improvement the
application was adapted and wireframes with hyperlink capability were created.
Wireframe of the scanning a delivery.
Final Design
Login and Onboarding
Within the app, the user is able to update
the authentication method by changing the passcode or by enabling or disabling the biometric
identification. In case that the user cannot access the wallet application anymore (i.e. lost
or damaged smartphone, forgotten passcode etc.) the system administrator can execute the key
recovery. Additionally, the user can (in time, of course) nominate one or several trusted people
as guardians who are then able to restore the access to the app with their own wallets.
The button “Forgot Passcode” serves the purpose that the user is able to regain access to their
account. A QR code is generated, which can be scanned by the user’s guardian thereby confirming
this user’s legitimacy. While the account is being recovered, the user is given feedback by a
waiting screen.
Starting Screen, Login and Forgot Passcode
After the user’s first login, they are presented with an information screen letting them know
that an immediate change of the passcode is mandatory. This screen
is accompanied by an illustration which underscores the instruction.
For an optimal user experience, the user gets the the option to also login with face
recognition. This screen is supported by the familiar Face ID icon and a simple explanatory
text. This feature can, however, be also set up at a later time.
User's first login
The onboarding consists of three screens educating the
novice user about the workflow they are going to use.
The last onboarding screen has a button “Get Started” which leads
the user to the main overview.
Onboarding
Overview
Overview
The button for employee management is only visible to the administrator. The screen
displays a search bar to look up keywords as well as the main functions which are received and
issued goods and completed transactions. Below the search bar three shortcuts (buttons) have
been added for the user to view the complete lists and their details.
In addition, a summary of
each category is presented in a highlighted section. The main page has changed in design from
the previous prototypes in order to supply the user with a better overview.
Profile and Security
The profile section is quickly accessible through the tab bar and leads the user to their
individual security features and account settings. This screen allows the user to view their
user ID, change their authentication method, choose guardians and personalize various other
settings.
Profile and passcode settings
In case the user wants to select a colleague to become their guardian, they are presented with an
information screen after choosing the menu item “Guardians” in the profile section. This
information screen explains shortly what this feature does. After this message is acknowledged,
the “Select” button guides the user to the next screen where guardians can be managed.
The
screen uses iOS “Segmented Controls” to separate the functions into “Who I protect” which is
empty in the beginning and “Who protects me” whose only entry at first is the administrator. A
bell icon which activates when a user is asked to recover another employee‘s account was placed
at the top right corner. When entering this recovery section, the user sees a message in order
for them to reactivate a colleague who has to regain access to their account.
Guardian and recovery screen
If the user wants to select a new guardian for themselves, the screen provides an „Add Guardian“
button and, when this is pressed, a list of eligible colleagues. Selecting an employee’s name
automatically activates them as “Guardian” which is visualized by a checkmark next to the
employee’s name. When deactivating a guardian, an alert message asks for confirmation.
Managing guardians
Employee Management
From the tab bar on the home screen (“Your Overview”) the administrator can access the
employee’s list which is similarly structured as the “Profile” screen, however, with the
addition of a search bar. Deleting multiple users is possible through swiping from right to
left, a common mechanism in mobile design. The administrator can also edit an employee’s user
rights, as well as delete them entirely. Yet again, an alert message requires an explicit
confirmation to prevent any errors.
Employee management
The administrator can also add a new employee by pressing the “plus” icon on the main employee
screen. First, a profile type has to be chosen, either granting the new user full privileges
(administrator) or restricted rights (standard user). To set up the profile, the administrator
can enter the data manually or press the “camera” icon inside the first input field, in order to
scan the existing personnel ID card. After taking the picture, the input fields are completed
and the administrator can select a temporary passcode for the new employee. The button “Create” requires the
administrator to re-enter this temporary passcode and finalizes the set up process. The
administrator is presented with a loading screen informing them that a new employee is being
generated.
Adding new employees
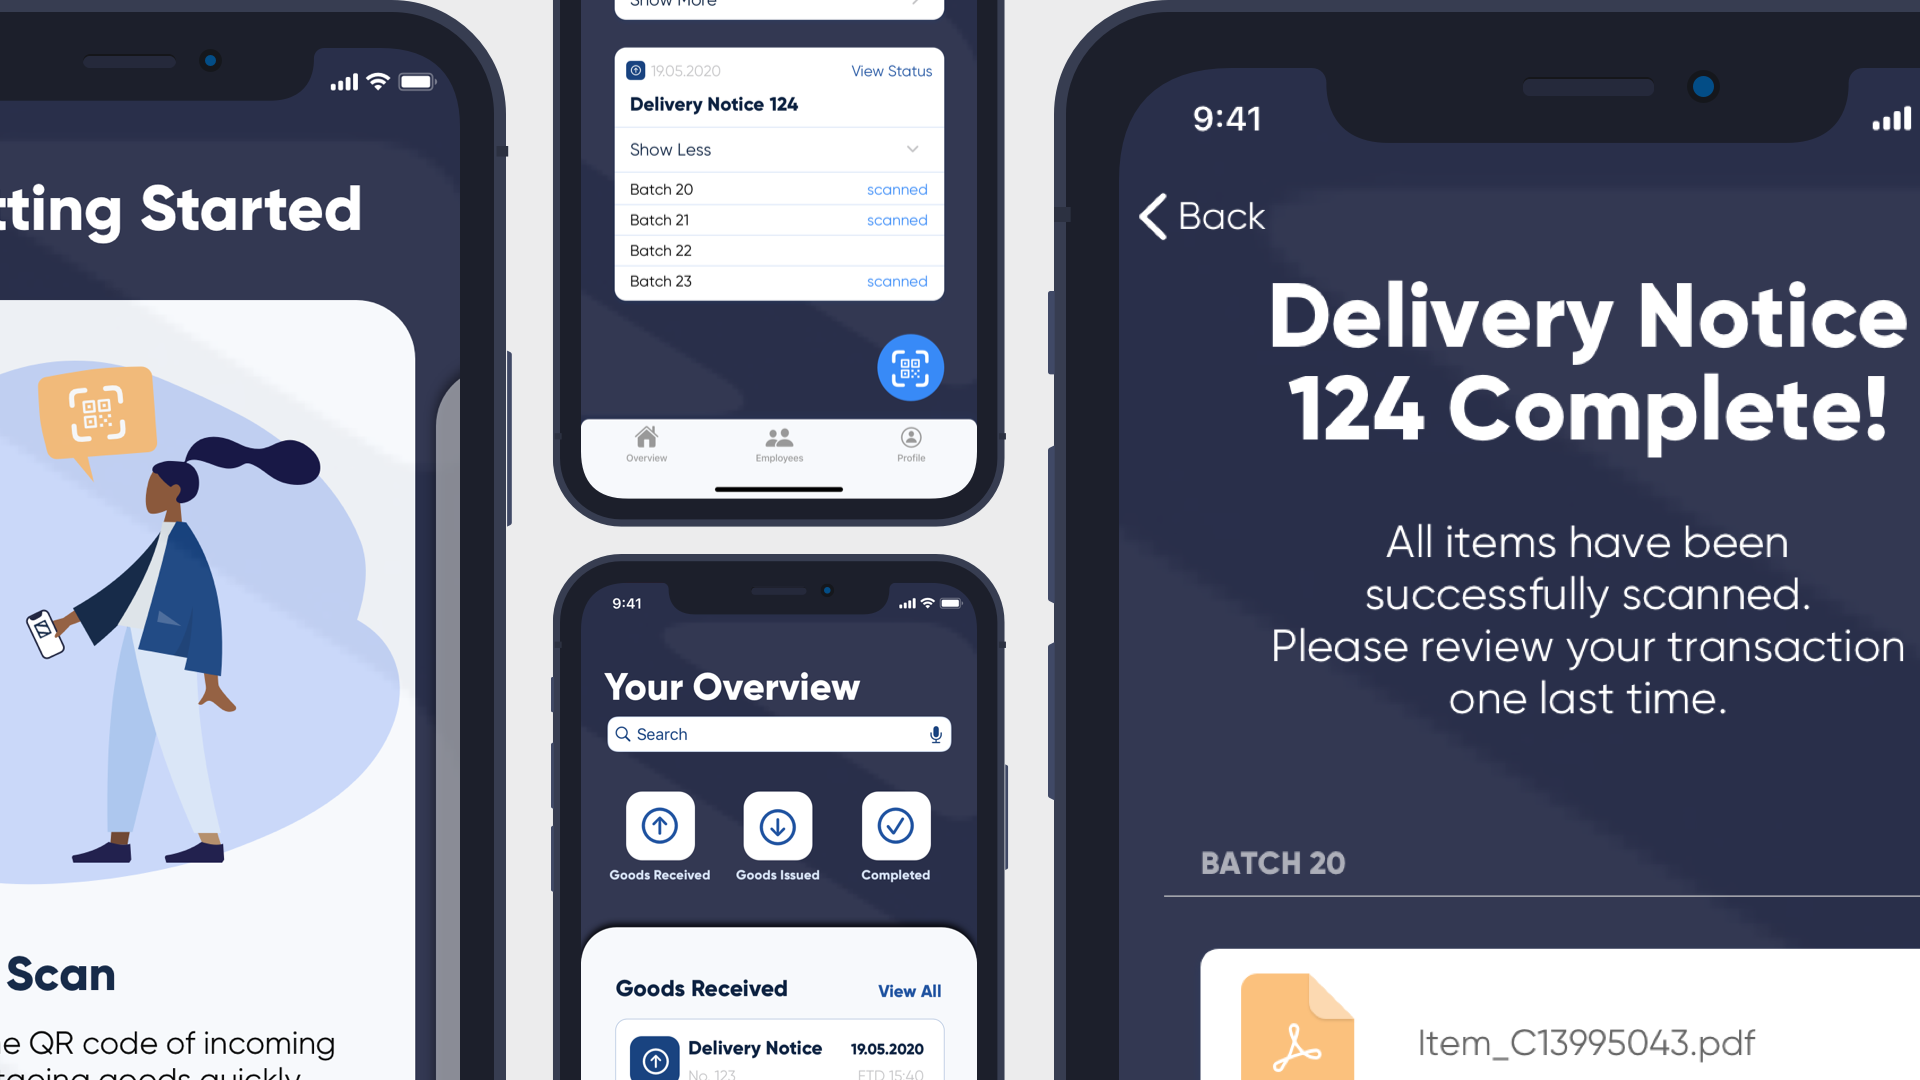
Scanning
The scanning overview of received or issued goods is easily accessible from the home screen.
The pending tasks are displayed as cards which can be expanded to view the details
of each delivery notice that they represent. A “View Status” button is also provided in order to track the delivery.
Items that have already been scanned, are marked with a “scanned” label.
In order for the employee to save time, the screen contains a QR code scan button which allows
for the scanning of a product code without having to select a delivery notice before. Matching
the product to the corresponding delivery notice is done in the background. The “Scan QR Code”
screen shows a frame overlaying the picture provided by the built-in camera where the user has
to place the QR code of the product.
When the scanning is successful, the “Review Scan” is presented to the user, which shows the raw
data of the scanned product as well as the created PDF file. This file can be viewed immediately
or at a later time. The employee has to confirm or redo the new scan. If all items from the
delivery notice have been scanned, the user receives an information screen that this task is
complete and shows another overview of all documents that have been created in the process. Finally,
the task can be uploaded to the blockchain. Another loading screen appears which notifies the user
that their documents are being uploaded.
Scanning received goods
While designing the user interface for the high-fidelity mockups, special attention was given to using clear, concise and jargon-free language, consistent screen elements and layout, the use of design guidelines, giving meaningful feedback and anticipating possible errors.